

Tutorials » Spitfire Audio » A tour of the 2024 UI
In this blog I'll be looking at the latest iteration of the user interface I've written for Spitfire Audio's Kontakt-based instruments and libraries. It should look relatively familiar to anyone that's had experience with the previous BML range of products but there are a few new tips and tricks you might not be aware of. One change you're probably welcome to see is that it's a lot bigger than the previous interface!
Controllers and the Playing Guide
The top half of the new interface is dedicated to various controls you have at your disposal to shape the sound of the instrument. This ranges from standard things such as Expression (the instrument's volume 0-100%), Vibrato, Dynamics, etc.
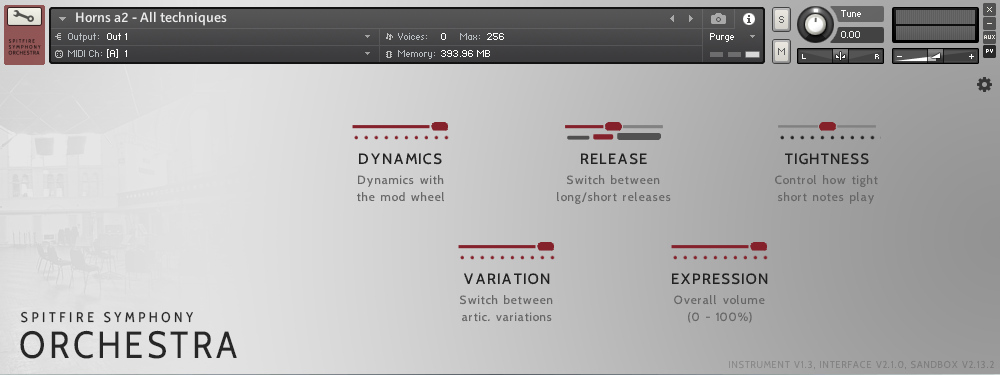
Each controller can be right clicked to resassign them to the CC of your choice. This is particularly useful if you have a MIDI controller with a limited number of knobs/sliders and want to control multiple parameters at once. For example, you could assign Expression and Vibrato to the same knob and control both at the same time. You can also hold CTRL/CMD and click on the controller to reset it to it's default value. Holding shift while dragging will allow you to make fine adjustments to the controller.
The Playing Guide is a new feature introduced to complement Andy Blaney's amazing Total Performance patches. It's a visual guide to the instrument's dynamic range, modulation and articulations. The guide reacts to your playing, highlighting the triggered attack and legato transitions. It's a great way to see what's happening with the instrument in real-time.
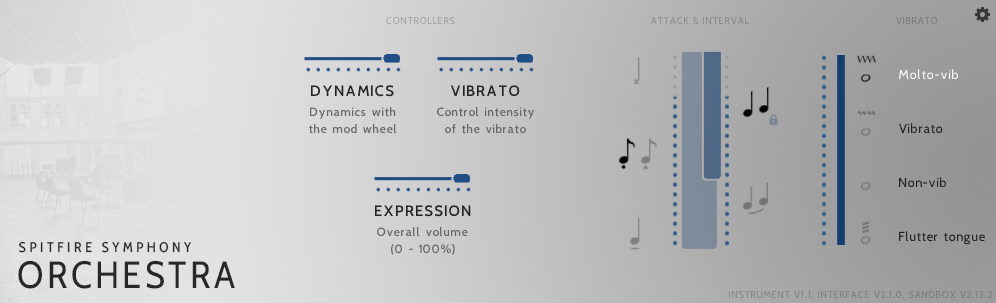
When you hover the mouse cursor over an attack or transition, you'll notice a small lock icon appear. Clicking this will lock the instrument to always use that attack or interval. this is particularly useful if you're trying to get a specific sound out of the instrument and want to ensure it's always triggered.
The Stanza
The centre of the instrument is dedicated to the Stanza. This is where you'll find the instrument's core articulations and functionality. Clicking a notation icon in the stanza will activate that articulation. The current active articulation is listed to the left with relevant information such as the keyswitch or UACC number (depending on what's currently active). Be aware that some instruments contain too many articulations to fit on-screen at once. In these instances, a scrollbar is provided under the stanza to allow you to scroll through the available articulations.

Holding SHIFT and clicking a notation icon will toggle the articulation on/off. This is particularly useful if you're trying to layer multiple articulations together. Holding CTRL/CMD and clicking will bring up the Articulation switcher. You can read more about this feature in a previous blog of mine.
If you hold down the mouse over the articulation name and drag left and right, you can scroll through the available articulations. Right clicking this same area allows you to map this action to a CC of your choice (defaulting to CC32).
Underneath each articulation is a small toggle switch. Turning this on and off will load and unload the articulation from memory, providing a handy way to manage the instrument's memory footprint.
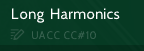 If you have UACC activated in the instrument's options, the UACC number will be displayed underneath the articulation name. A small icon appears alongside it that can be clicked to change the UACC number of the selected articulation in case you need to customise it. More information on UACC can be found in this blog.
The mixer
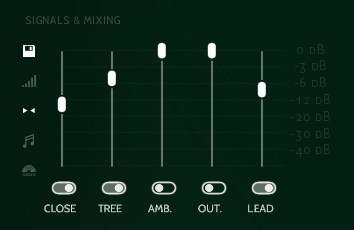
The bottom-left of the instrument hosts the signal mixer. You can adjust the volume of the various signals contained in the library. As with the controller sliders, each one can be right clicked to assign to a CC, CTRL/CMD clicked to reset to default, and shift dragged to make fine adjustments. Toggle switches underneath will allow you to purge the signal from memory.
Usually, the microphone signals will be loaded in and out of memory based on the volumes configured. You can prevent this behaviour by holding alt while dragging. Holding alt and shift together while dragging will adjust all of the sliders at once.
Mix presets can be copy, pasted, loaded and saved to quickly transfer the settings between your instruments. Note that copy-pasting only works with instruments in the same library.
Velocity curve
You can configure the velocity curve using the Velocity Curve button. This allows you to adjust the curve to your liking. It has a range of common options such as linear, shelf or exponential, as well as the option to draw in a custom curve.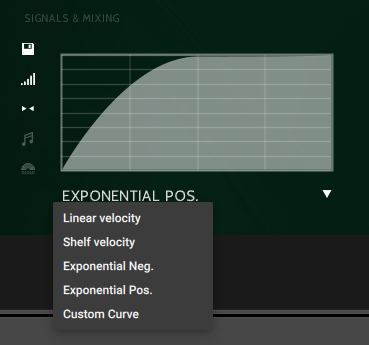
Stereo balance
For most instruments, there's also a handy Stereo Balance control. This allows you to adjust the balance between the left and right channels of the instrument on a per-signal basis. Useful if you want to adjust the balance between the two channels.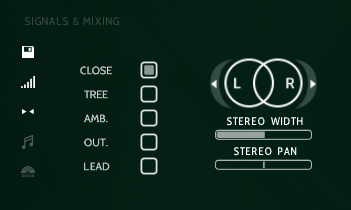
Easy mixer
For multi-mic libraries, if you want to quickly dial in a sound, the Easy Mixer button will bring up a window with a simplified mixer. The easy mixer can be dragged from close to far to adjust the perceived distance or wetness of the sound.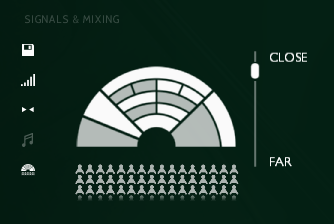
Options
Finally, the bottom-right of the user interface contains the usual configuration options you'll be used to with Spitfire Audio instruments.
- Purge unused toggles whether unused round robins, articulations or signals are purged from memory when not in use. You should keep this on unless you really need everything loaded at once.
- Transpose allows you to shift the instrument's mapping up and down the keyboard to suit your needs.
- Keyswitches similarly allows you to shift the keyswitches (shown as red keys on the Kontakt UI) up and down the keyboard.
- Sync to Tempo uses a little bit of memory to sync articulations such as tremolos or trills to your project's tempo. Some libraries also use this for loops or drum patterns.
- Hall trigger can be found on orchestral libraries to toggle whether the hall's presence is maintained when the instrument's dynamics change quickly.
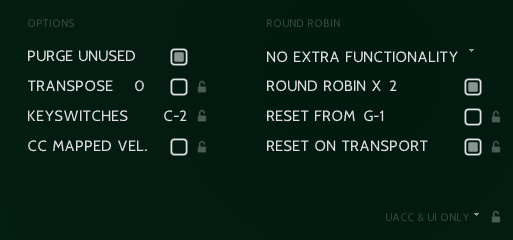
- No Extra Functionality can be clicked to drop down a menu of handy transposition options that let you pitch shift the instrument in ways to extend round robins, or layer multiple instruments together.
- Round Robin lets you enable or disable instrument round robins, and configure how many to utilise. Unused round robins will be purged from memory.
- Reset from [key] lets you configure a special keyswitch that will reset (or set) the round robin to a specific value. This is useful if you're keen to ensure the same round robin is triggered each time.
- Reset on Transport configures whether the round robin is reset when the transport is stopped or started.
Lastly, at the bottom is a drop-down menu allowing you to switch between how articulations are activated. It defaults to keyswitching, but can be set to other options such as UACC, program changes, customised keyswitches and more. You can read more about this in my blog about articulation switching.
Dotted around the UI, you'll notice small icons next to various options. Toggling these locks on will cause the respective option to always be set when loading any instrument in the product's range. This is particularly useful if you have a specific workflow you like to stick to. Use this option carefully as it will override any settings you've previously made in your DAW projects.
Extra configuration
In the latest version of the UI, you'll find a small settings icon in the top-right of the interface. This allows you to toggle some extended, advanced options.
- UI style allows you to switch between four different views for the instrument. Regular, Mini (Controllers and Stanza), Nano (Controllers / guide) and Controllers-only. Once changing this option, you need to reload the instrument (or your DAW project) for the changes to take effect.
- Polyphonic KS lets you disable the shift key from activating multiple keyswitches in case this is causing undesirable behaviour.
- CC32 switching similarly lets you enable or disable CC32 from changing the current articulation.
- Create Dummy KS activates the option to create 'dummy' keyswitches. These are keyswitches that disable all articulations. The primary use for this is when loading multiple instruments in a multi (eg. Core and Performance legato) and you want to ensure only one articulation is active at a time. Simply turn it on, play the keyswitches that you want to act as a 'dummy' and then turn it off.

To wrap things up
That's a quick tour of the new UI. There should be nothing particularly new here if you're familiar with the previous UI, but there are a few new tips and tricks that might help you get the most out of your instruments. If you have any questions, feel free to ask in the comments below!
© 2026 Blake Robinson Synthetic Orchestra
All original content available from this site © 2026 Synthetic Orchestra™ Ltd. All Rights Reserved. Orchestrations, Covers, Remixes & Trademarks are hosted externally and © their respective copyright owners. Have you heard the good word about chips?